Geocoding: A Crash Course (because this is a workshop in progress, and geocoding is hard and we will crash a little).
Shortlink: http://bit.ly/crashgeocoding
Github Repo: https://github.com/mapninja/Tutorial-Geocoding-Crash-Course
Webpage version of this repo, here: http://mapninja.github.io/Tutorial-Geocoding-Crash-Course/
Download the repo as a .zip file to get the data for the exercises: https://github.com/mapninja/Tutorial-Geocoding-Crash-Course/archive/master.zip
Slides: https://slides.com/staceymaples/geocoding-101
Specialty Geocoding APIs:
- Yandex - Geocoding and Routing API for Russia, Eastern Europe and Western Asia.
- MapMyIndia.com - Geocoding and Routing API (plus many others!) for India
Things to talk about:
Basics of Geocoding
Geocoding, in the context of this service, is the use of reference datasets (such as street networks, administrative boundaries and gazetteers) to convert text-based locations (such as street addresses, administrative units or placenames) into explicit locations, or latitude/longitude coordinate pairs, in most use cases. These resulting coordinates are often used to extract values from other datasets, based upon location, or for measurement of proximity to other features and phenomena.
- Street Addresses
- Placenames
- Administrative Boundaries
- Esoteric Localities
- High-risk and PHI Geocoding
Preparing Your Address Table
Formatting a Table for Use in ArcGIS
Things GIS hates about your tables:
- Spaces or special characters (other than _ ) in field names
- Field Names that start with a number
- Empty Rows
- Merged Cells
- Excel Formulas
Specifics on tabular data for geocoding
- Most geocoding services prefer street addresses in a single field, with City, State, Postal Codes, etc… in separate fields.
- For placenames, concatenate administrative units, as follows:
Dallas, TX, USA
Collapse your addresses/placenames into a table of UNIQUE addresses/placenames!
That is, if you have a database of 2 million addresses, but there are many duplicates, use a summary or frequency tool to collapse those records into unique localities. For example, the Photogrammar data we will use with our custom ArcGIS Address Locator has 98k+ records, but only about 4000 unique locations. They can easily be joined back to the original dataset in a many-to-one join.
This should always be the first step in a geocoding job, as it saves time, processing and often credits or money.
Exercise #1 - Using the locator.stanford.edu Address Locators
Example Data
We’ll use one file from the data (at https://github.com/mapninja/Tutorial-Geocoding-in-ArcGIS ) for this exercise:
- Evictions_94102.csv - Download the raw version of this file into your working folder. Open it to ensure it contains comma-separated values, and not HTML.
The Stanford Geospatial Center maintains a Geocoding Server, based upon Esri’s ArcGIS Server technology. The server currently provides geocoding services for US Street Addresses, postal codes and administrative boundaries.
To access the Address Locator services:
- In ArcCatalog, or the Catalog Panel in ArcMap, expand the GIS Servers item
- Double-click the Add ArcGIS Server item
- Leave the default “Use GIS Services” option, click Next>
- For the ‘Server URL’ use: https://locator.stanford.edu/arcgis
- For ‘User Name’ use your SUNetID (prefixed with the ‘WIN' domain) as WIN\SUNetID
- Enter the password associated with your SUNetID and check the option to Save Username/Password
- Click Finish
- Under GIS Servers > arcgis on locator.stanford.edu > geocode folder, you will find the USA_StreetAddress Address Locator.
Running the geocoding job
- Drag and drop the USA_StreetAddress Address Locator from GIS Servers > arcgis on locator.stanford.edu > geocode into the Map Document to make it the default.
- Drag the Evictions_94102.csv into the Map Document and right-click to open it to examine the attributes, paying attention to the field names for the address fields.
- Right-click on Evictions_94102.csv and select Geocode addresses… and then click OK to use the default locator you set before.
- If at this point you hit an error, save your map document, close ArcMap, re-open it, and repeat this step. It often works on the second try.
- Set the appropriate fields in the Address input fields options
- Open the Geocoding options and examine them, but accept the server defaults.
- Select the path into which you want the Output shapefile to be written.
- Click OK to run the geocoder.
- Wait until the progress bar shows 100% and says Completed.
- Click Rematch to explore the results, try to manually match any unmatched records.
- In the Show results: drop down, select Unmatched Addresses.
- In the results, select a single address row.
- In the Candidates pane below, review the matching options, and select the right address. You can use the Score as a guideline on how closely each candidate matches the selected address.
- Click on the Match button to save the match.
- Repeat for all unmatched addresses.
- Once matching has been completed, Close the Rematch Dialog.
- Right-click the newly added results layer in the Table of Contents, and Zoom to Layer
- Add a Basemap for context.
Note:
There are a number of ways to leverage the SGC Address Locator server:
- Use the REST API to geocode using Python: https://developers.arcgis.com/python/guide/batch-geocoding/
- Use Claudia Engels’ R Script: https://github.com/StanfordGeospatialCenter/ArcGIS_geocoding
- Use ArcGIS Online, logged in using your SUNetID and Password, and select the default geocoder when prompted, after adding a table of addresses.
Exercise #2 - Building an Address Locator with ArcMap
Example Data
We’ll use two files from the data (at https://github.com/mapninja/Tutorial-Geocoding-in-ArcGIS ) for this exercise:
- US_county_1930_conflated.shp - the reference data we will use to build our geocoder. Download all the files from the US_county_1930_conflated folder.
- photogrammar_image_count.csv - Download the raw version of this file, and make sure it contains comma-separated values, not HTML.
Prepare the reference data
- Open ArcMap and bring the US_county_1930_conflated.shp data into an empty Map Document
- Open the attribute table, using Add Field create a new Text field called PLACE, with a length of 100
- Right-click on the new PLACE field header and Field Calculator
- If you get a warning about doing a calculate outside an edit session, click Yes.
- Use the following code to concatenate the COUNTY and STATE fields, adding appropriate commas and ‘United States’:
[NHGISNAM] &" County, " & [STATENAM]&", United States"
This should result in values like this:
Adair County, Missouri, United States
Create the Address Locator
- In the Catalog Panel of ArcMap, right-click on your ‘data’ folder and select New>Address locator…
- Under Address Locator Style select General - Single Field as the locator type.
- Set Reference Data to US_county_1930_conflated.shp.
- In the Field Map, select *keyfield and in the second column, set it to PLACE.
- Confirm the Output Address Locator path, and click OK to run the tool.
- Right click on the resulting Address Locator and inspect the Properties to see what changes you can make.
- Close the properties and drag the locator into the Map Document to make it the default locator.
Running the Geocoding Job
- Bring the photogrammar_image_count.csv table into ArcMap.
- Right-click to select Geocode Addresses, and verify that your new address locator is selected, otherwise select it. Click OK
- Change to Single Field and Select Column 1 as the key
- Click on Geocoding Options and:
- Change the Spelling Sensitivity and Minimum Match Score to 50
- Uncheck Match if Candidates tie
- Click OK, twice, to run the geocoder.
- Wait until the progress bar shows 100% and says Completed.
- Click Rematch to explore the results, then click Close.
- Use a Spatial Join to add the Geocoding Results attributes to the original US_county_1930_conflated.shp file
Geocoding with OpenRefine and an API
Example Data
- TexasHealthByCounty.csv - is the table we will geocode
- Other datasets we can play with included in the Challenge folder
Important Links:
OpenRefine.org: http://openrefine.org/
Understanding OpenRefine Expressions: https://github.com/OpenRefine/OpenRefine/wiki/Understanding-Expressions
The Geonames.org Geocoding API: http://www.geonames.org/export/geonames-search.html
The Tulane Geolocate JSON Wrapper API Documentation: http://www.museum.tulane.edu/geolocate/files/glcJSON.pdf
Online JSON Viewer: http://jsonviewer.stack.hu/
Getting Ready for the Tutorial
This tutorial will demonstrate how to use OpenRefine to submit URLs to web-based Geocoding APIs in order to augment an existing dataset with things like latitude & longitude coordinates, elevation values, drive times, etc…
OpenRefine is a piece of open-source software that allows you to manipulate data in many different ways. It’s not just great for geocoding and augmenting datasets, but is really great for cleaning up ‘dirty’ data, too.
For the needs of this tutorial, OpenRefine allows us to build and submit URLs to a web service (like a geocoding API) over and over tens, hundreds, even thousands or more times, saving us the trouble of typing a URL into a browser and copy&pasting values, one at a time. OpenRefine runs in your browser, but does so locally by installing itself as a sort of server running on your own machine. OpenRefine used to be called GoogleRefine, but has recently been re-branded, so much of the support materials you will find on-line will still refer to GoogleRefine.
![]()
You will, of course, need to download OpenRefine in order to complete this tutorial. You can get the appropriate version for your operating system from [OpenRefine.org] (http://openrefine.org/). In the meantime, there are 3 videos on the OpenRefine frontpage. You should take a look at all three, because they give a great, concise overview of many of the capabilities of OpenRefine. For the purposes of this tutorial, it wouldn’t hurt to watch the 3rd video, linked here:
http://www.youtube.com/watch?feature=player_embedded&v=5tsyz3ibYzk
You might also want to take a look at this page on “Understanding Expressions” in OpenRefine:
https://github.com/OpenRefine/OpenRefine/wiki/Understanding-Expressions
And, here’s the full Documentation Wiki:
https://github.com/OpenRefine/OpenRefine/wiki/Documentation-For-Users
What is an [Geocoding] API?
An API (Application Programming Interface) is, essentially, a set of instructions that allows computer programs to pass data back and forth. In the following exercises, we will be using several Web APIs. The Web APIs we will use allow you to submit a URL just like when you type a URL into your browser address bar. The important difference is that the URL we are submitting has a bit of data (an address or coordinate pair) that we want to know something about. Rather than giving us back an HTML file that instructs our browser to retrieve images, text and other object and arrange them into a webpage, the Web APIs we will be using give us back information about the address/coordinate pair we submitted.
Exercise #3 Geocoding with the Geonames.org API
Create an Account
Examine the API Docs
http://www.geonames.org/export/ws-overview.html
We’re interested in the Search API
http://www.geonames.org/export/geonames-search.html
Use the Advanced Search Box to Help Build a URL
http://www.geonames.org/advanced-search.html?
- Search for ‘Bexar County, Texas’; Country=’United States’; Feature Class=’Country,State,Region…’
The resulting URL should look like this:
http://www.geonames.org/advanced-search.html?q=Bexar+County%2C+Texas&country=US&featureClass=A&continentCode=
Open up a new Browser Tab and Cut&Paste the part of the URL from the ‘q=’ parameter, all the way to the end of the URL, like this:
q=Bexar+County%2C+Texas&country=US&featureClass=A&continentCode=
We’re going to build our API Url from this. First, paste the API Base URL in front of the part you just pasted:
Here is the Base URL:
api.geonames.org/search?
Here is what it should look like after pasting the two together:
api.geonames.org/search?q=Bexar+County%2C+Texas&country=US&featureClass=A&continentCode=
You can go ahead and hit enter to submit the URL. WHat you will get is an XML file, with an error message. This is because to use the API, you are required to identify yourself each time you submit a query. Now, you need to add a parameter that identifies you. You will add the username parameter, using your own username that you created when you registered with Geonames.org:
The parameter is:
&username=?????????
Where you will replace the ???????? with your Geonames Username. Just put this right on the end of the URL you are building:
api.geonames.org/search?q=Bexar+County%2C+Texas&country=US&featureClass=A&continentCode=&username=?????????
Now try hitting enter to submit the URL, again. You should see something like the below (it’s a large amount of text, since we haven’t limited the returns, yet):
This XML file does not appear to have any style information associated with it. The document tree is shown below.
<geonames style="MEDIUM">
<totalResultsCount>14</totalResultsCount>
<geoname>
<toponymName>Bexar County</toponymName>
<name>Bexar County</name>
<lat>29.44896</lat>
<lng>-98.52002</lng>
<geonameId>4674023</geonameId>
<countryCode>US</countryCode>
<countryName>United States</countryName>
<fcl>A</fcl>
<fcode>ADM2</fcode>
</geoname>
<geoname>
<toponymName>City of Elmendorf</toponymName>
<name>City of Elmendorf</name>
<lat>29.25547</lat>
<lng>-98.31695</lng>
<geonameId>7173379</geonameId>
<countryCode>US</countryCode>
<countryName>United States</countryName>
<fcl>A</fcl>
<fcode>ADMD</fcode>
</geoname>
and so on...
Now we will add the last two parameters to the URL and see what the result looks like. First, we want to return JSON, instead of XML, so let’s add the paramet ‘JSON’ just after the ‘search’ and ‘?’ in the URL, so our URL looks like this:
http://api.geonames.org/searchJSON?q=Bexar+County%2C+Texas&country=US&featureClass=A&continentCode=&username=??????
Hit enter and notice that returned format has changed (also note that I have formatted the following for easier viewing and that the JSON you get back will not have line breaks and indents):
{
  "totalResultsCount": 14,
  "geonames": [
    {
      "adminCode1": "TX",
      "lng": "-98.52002",
      "geonameId": 4674023,
      "toponymName": "Bexar County",
      "countryId": "6252001",
      "fcl": "A",
      "population": 1714773,
      "countryCode": "US",
      "name": "Bexar County",
      "fclName": "country, state, region,...",
      "countryName": "United States",
      "fcodeName": "second-order administrative division",
      "adminName1": "Texas",
      "lat": "29.44896",
      "fcode": "ADM2"
    },
    {
      "adminCode1": "TX",
      "lng": "-98.31695",
      "geonameId": 7173379,
      "toponymName": "City of Elmendorf",
      "countryId": "6252001",
      "fcl": "A",
      "population": 1488,
      "countryCode": "US",
      "name": "City of Elmendorf",
      "fclName": "country, state, region,...",
      "countryName": "United States",
      "fcodeName": "administrative division",
      "adminName1": "Texas",
      "lat": "29.25547",
      "fcode": "ADMD"
    },

    And so on...
Finally, let’s use the &maxRows=1 parameter to tell Geonames to only return a single row of information, and the &featureCode=ADM2 parameter (we only want County Names, returned), so that our URL looks like this:
http://api.geonames.org/searchJSON?q=Bexar+County%2C+Texas&country=US&featureClass=A&continentCode=&username=?????&maxRows=1&featureCode=ADM2
Hit enter to test the URL and you should return the following (again, unformatted):
{
  "totalResultsCount": 1,
  "geonames": [
    {
      "countryId": "6252001",
      "adminCode1": "TX",
      "countryName": "United States",
      "fclName": "country, state, region,...",
      "countryCode": "US",
      "lng": "-98.52002",
      "fcodeName": "second-order administrative division",
      "toponymName": "Bexar County",
      "fcl": "A",
      "name": "Bexar County",
      "fcode": "ADM2",
      "geonameId": 4674023,
      "lat": "29.44896",
      "adminName1": "Texas",
      "population": 1714773
    }
  ]
}
Bulk Geocoding Against the Geonames API with OpenRefine
Now it’s time to start up OpenRefine and use the URL we’ve just created to submit a Geocoding Request for each of our Texas Counties.
-
Start OpenRefine by double-clicking the Google-Refine.exe (yours will likely have a version number or it might even be called OpenRefine, if you downloaded the Beta release)
-
Click on the Create Project link.
-
Select the option to Get data from this computer and Click on the Choose Files button.
-
Browse to the TexasHealthByCounty.csv and Select it. Click Next
-
Make sure the data is properly formatted in the Preview, change the Parse data as parameters until the data is properly formatted. Click Create Project in the upper right corner of the page.
Concatenating Fields in OpenRefine
If you haven’t already, now is a good time to take a look at the basics of the GREL (Google Refine Expresion Language) https://github.com/OpenRefine/OpenRefine/wiki/Understanding-Expressions.
We will first concatenate the County and State fields, inserting “County, “ as well, for a well formatted placename.
-
Click on the Drop-down Arrow next to the County fieldname and go to Edit Column>Add Column Based on This One>
-
Name your new column ‘placename’
-
Paste the following into the Expression Window:
value+" County, Texas"
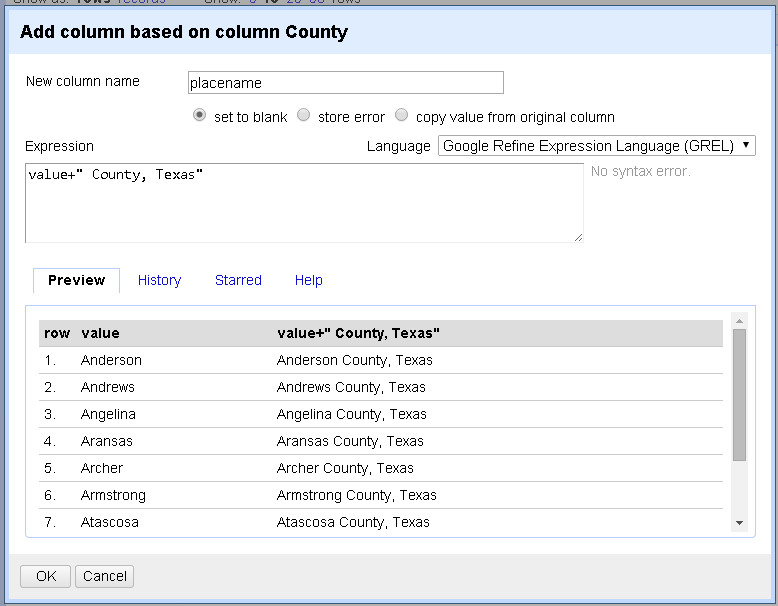
- Notice that your Preview updates and you should see ‘Anderson County, Texas’ as the result for the first record. Click OK to calculate the concatenation for all of the records in the table.
Using Our URL as a Template
Now is the time to return to your URL you created, and Copy it from the Browser Address Bar. Again, it should be something like this (with ?????? replaced by your Geonames Username):
http://api.geonames.org/searchJSON?q=Bexar+County%2C+Texas&country=US&featureClass=A&continentCode=&username=???????&maxRows=1&featureCode=ADM2
-
Now Click on the Drop-down Arrownext to the ‘placename’ field and go to Edit Column>Add Column by Fetching URL
-
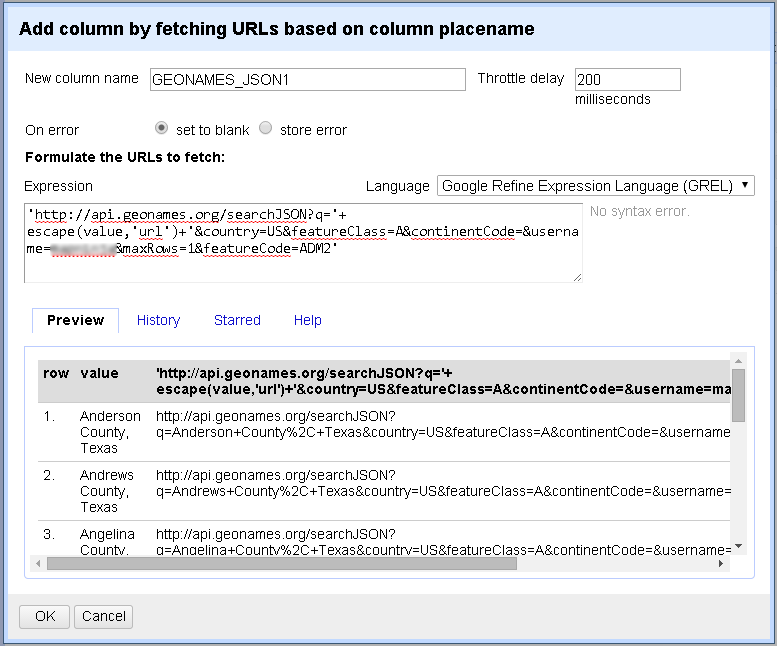
Paste your template URL into the Expression Window (this will result in a null values in the preview, that is fine):
-
Now, Copy the following text:
'+ escape(value,'url')+'
- Carefully select the following text from the URL you just pasted into the Expression window and replace it by pasting the text you just copied from the clipboard”
Bexar+County%2C+Texas
-
Add single quotes (‘) to the beginning and end of the Expression and you should see the syntax error dismissed.
-
Name your New Column “GEONAMESJSON1” and set the Throttle Delay value to ‘200’ milliseconds (this will tell OpenRefine to submit 5 Geocode Requests per second).
Wait for the geocoding to finish (a few minutes, HOORAY FOR PROGRESS MESSAGES!) and you should have something like this:

Parsing the JSON for what you need
What is JSON?
For our purposes, we don’t really need to go deeply into what JSON (JavaScript Object Notation) is. It is enough for you to know that it is a format for storing and exchanging data in human readable text format and that it is an output format for all of the APIs we will use, as well as most web-based data APIs.
Making sense of JSON
OK, so that JSON we got back might be a little intimidating if you aren’t used to looking at code, but if you just bend your knees and take a deep breath, then look closely, you will see that there is actually some useful information in there! In fact, if what we are doing is geocoding placenames, it’s got exactly what we need on the line that begins with “geometry”:
"geometry": {"type": "Point", "coordinates": [-89.84861, 30.79083]},
See them!? There are longitude/latitude coordinates in there! That’s what we are after! You can make the JSON data even more readable with:
Copy&Paste the JSON from the example we clicked earlier into the http://jsonviewer.stack.hu/ text tab and click on the Format Button in the Main Menu. Then switch to the Viewer Tab…

Then, Expand all of the elements in the hierarchy so that you have something that looks like this:
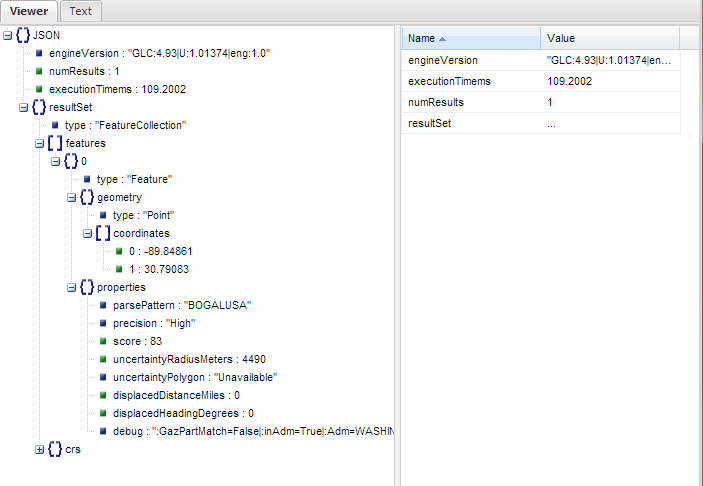
You can see that the latitude and longitude coordinates are under the coordinates object. If you track back through the hierarchy from the coordinates object, you will find that the address of the longitude coordinate [-89.84861] is:
resultSet.features[0].geometry.coordinates[0]
Cut and paste one of your JSON records into the text tab of the Online JSON Viewer at http://jsonviewer.stack.hu/, then click Format and then click on the Viewer Tab and expand all of the elements in the panel on the left:
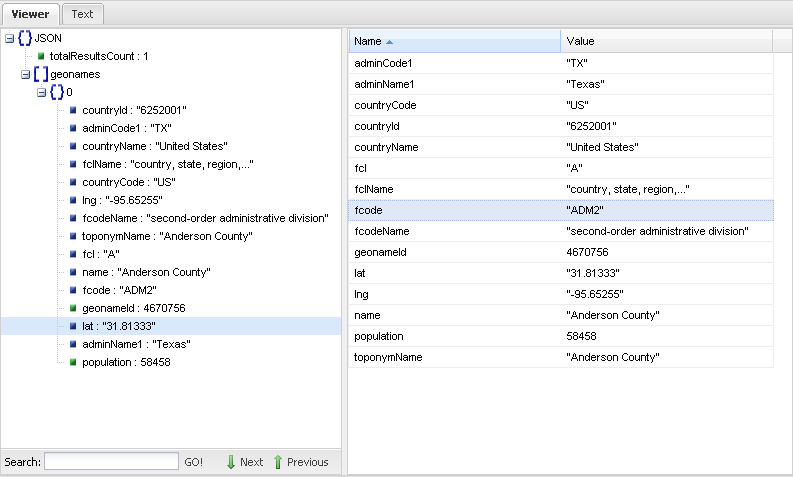
value.parseJson().geonames[0].lat
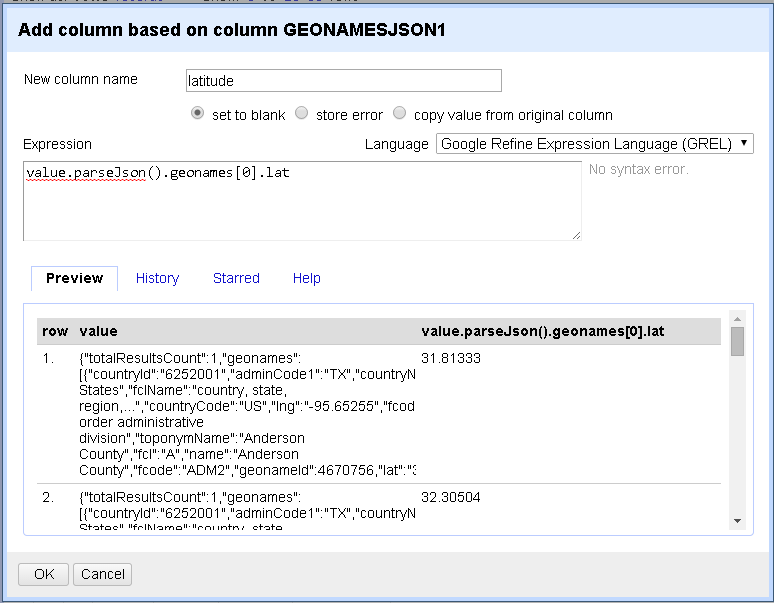
value.parseJson().geonames[0].lng
Geocoding with Geolocate
this section in progress
Geolocate Tulane
Limits
There are no licensing restrictions on the Tulane Geolocate service. The API can be used for any geocoding purpose and for any amount of data. That said, the service does have some technical limitations. I have observed that a more stable result is achieved when using no more than 5 requests per second. Another thing to consider is the purpose for which Geolocate was created. Geolocate is very good at geocoding to administrative boundaries, but was not designed to geocode street addresses, so if that is what you have, you will have to use an alternative service.
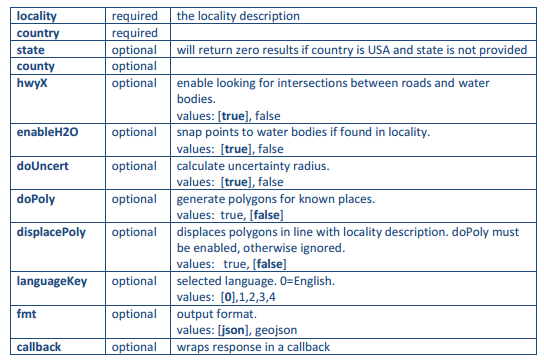
Here are the Geolocate Parameters, once again:
![JSONViewer Collapsed] (/images/Geolocate_API_Parameters.png)
Most of these are fairly straightforward. The ones that most concern us for the current tutorial are the following:
locality - This is the “address” or placename you are actually looking for. Geolocate is actually built to handle fairly esoteric localities (like “3 miles north of the confluence of the X and Y rivers”).
country - This is the country that your locality is in. This is a required parameter for all Geolocate Searches.
state - This is listed as an optional parameter in the Geolocate JSON Wrapper DOc, but it is REQUIRED if you are geocoding data within the United States and set your ‘country=USA’.
API Overview
Again, here’s the basic structure of the URLs you will submit to the Geolocate JSON Wrapper Web API:
http://www.museum.tulane.edu/webservices/geolocatesvcv2/glcwrap.aspx?Country=USA&Locality=bogalusa&state=la&fmt=JSON
From the sample above:
http://www.museum.tulane.edu/webservices/geolocatesvcv2/glcwrap.aspx?
…is the base URL of the (Geolocate Search API) [http://www.museum.tulane.edu/geolocate/]…
Country=USA&Locality=bogalusa&state=la&fmt=JSON
…are the parameters of the search. In this case, there are four basic parameters to the search.
Exercise #4 (in progress) Geocoding with the Tulane Geolocate API
Submitting a URL
Here’s the basic structure of one of the URLs you will submit to the one of the Web APIs we will be working with:
http://www.museum.tulane.edu/webservices/geolocatesvcv2/glcwrap.aspx?Country=USA&Locality=bogalusa&state=la&fmt=JSON
From the sample above:
http://www.museum.tulane.edu/webservices/geolocatesvcv2/glcwrap.aspx?
…is the base URL of the (Geolocate Search API) [http://www.museum.tulane.edu/geolocate/]…
Country=USA&Locality=bogalusa&state=la&fmt=JSON
…are the parameters of the search. In this case, there are four basic parameters to the search…
Country=USA
…this first parameter indicates to the Geolocate API what country the placename you are searching for is in. This is a required parameter in the Geolocate API.
&Locality=bogalusa
…this is the placename you are searching for.
&state=la
…this is the name of the state that the locality you are looking for is in. In the Geolocate API, this is a required parameter if you are searching for placenames within the USA.
&fmt=JSON
…this parameter indicates the type of output you would like to get back from the Geolocate API. Currently, the Geolocate API is able to return JSON or GeoJSON. We will discuss these formats, and their differences, later.
Here are the rest of the supported parameters from the Geolocate API:
Getting back JSON
For the time being, try submitting the above search to the Geolocate API by clicking on this link:
What you get back should look like this (sans the fancy syntax highlighting Github does):
{
engineVersion: "GLC:5.21|U:1.01374|eng:1.0",
numResults: 1,
executionTimems: 78.0002,
resultSet: {
type: "FeatureCollection",
features: [
{
type: "Feature",
geometry: {
type: "Point",
coordinates: [
-89.848686,
30.79102
]
},
properties: {
parsePattern: "BOGALUSA",
precision: "High",
score: 84,
uncertaintyRadiusMeters: 4490,
uncertaintyPolygon: "Unavailable",
displacedDistanceMiles: 0,
displacedHeadingDegrees: 0,
debug: ":GazPartMatch=False|:inAdm=True|:Adm=WASHINGTON|:NPExtent=7455|:NP=BOGALUSA|:KFID=LA:ppl:9064|BOGALUSA"
}
}
],
crs: {
type: "EPSG",
properties: {
code: 4326
}
}
}
}
Resources
Geocoding Services
Geocoding APIs:
Gazetteers
- WhosOnFirst
- NGA GNS